Thursday, September 15, 2022

Chart Data Tables

Chart data table is a feature of charts, that presents in the chart area a data table with the values that are visualised by the chart. The data table is positioned automatically at the bottom of the chart, and can for certain chart types replace the X-axis labels. Until now this feature has been missing in LibreOffice, but thanks to the funding of NGI, it is now implemented.


This project has received funding from the European Union’s Horizon 2020 research and innovation programme under grant agreement No 871498


Figure 1: Charts with a data table

Chart data table usage and description

Figure 2: Insert data table dialog


The chart data table can be added to the chart from the menu (Insert -> Data Table...), where it is possible to select to show the data table and set the data table specific properties (see Figure 2). The data table specific properties are:

  • Show Horizontal Border
  • Show Vertical Border
  • Show Outline
  • Show Keys
The properties "Show Horizontal Border" and "Show Vertical Border" control if the inner horizontal or vertical borders of the data table are shown or not. The "Show Outline" controls if the outline - borders around the data table are shown or not. "Show Key" controls if the legend keys for the data series are shown in the data table in addition to the data series (row) names.
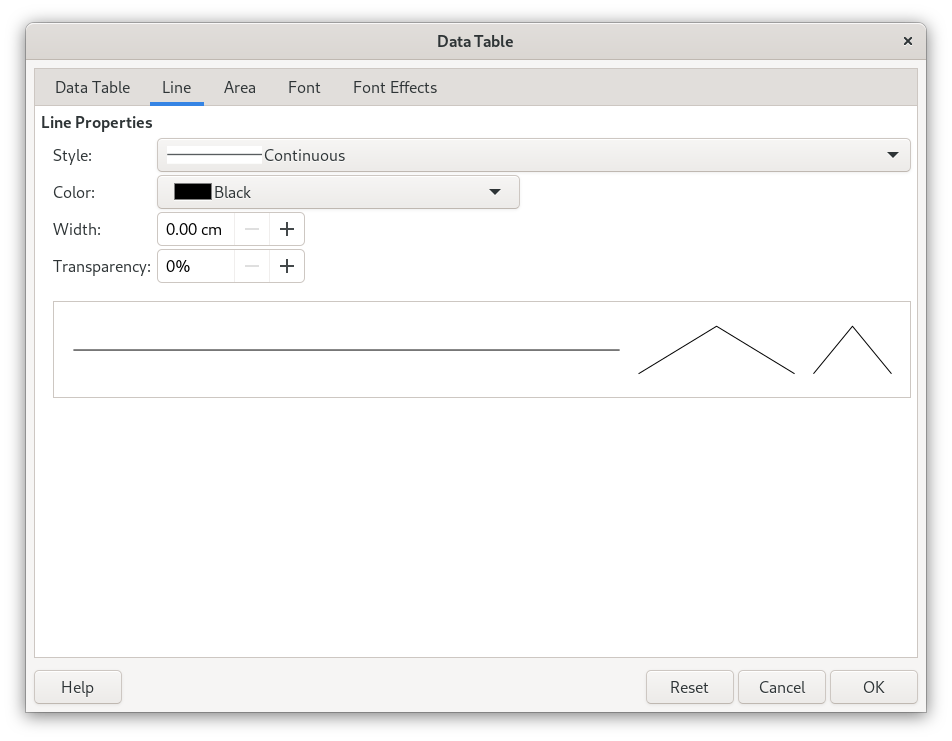
Figure 3: Data Table Dialog


In addition to those data table specific properties it is also possible to change the line, fill and font properties of the data table (see Figure 3). For example the line properties define how the borders (lines) will be shown, so it is possible to change the line style (continuous line, dashes, dots), the colour of the line, transparency, line thickness. The fill properties defines the colour of the cell background and the font properties what font and size the is used for the text in the data tables.

Implementation

The data table implementation is located in the chart2 component, like all the other chart related code. A data table is represented in the model by a new DataTable (chart2/source/inc/DataTable.hxx) class (extending the XDataTable interface) and lives on the "Diagram" object. If there is no DataTable object, it means the data table is turned off. The DataTable holds the data table specific properties as well as line, fill and font properties.

The automatic positioning of the data table is done similar like the x-axis labels, as the data table is also meant to replace the x-axis labels, unless it is not able to do so, because of the chart type (for example the "bar chart", which has the main x and y axis swapped). 

Rendering is done on the DataTableView class (chart2/source/view/inc/DataTableView.hxx), which creates a table shape and positions that into the chart. The row headers (data series names) and column headers (x-axis names) and values (from the data series) are filled into the table cell by cell, where also the cell properties are mapped from the model (DataTable class), so the data table looks correctly.

Document format support

Data table is supported by OOXML (c:dTable element). There was already present reading and writing of the basic data table properties ("horizontal border", "vertical border" and "outline" but not "keys") to preserve the document formatting even when LibreOffice couldn't render the data table itself. The properties however were not present at a convenient place (directly on the Dialog object in the model) so this had to be refactored to use a DataTable class instead. Now the OOXML support can not only preserve the complete properties (including line, fill, font) and of course also render the data table properly. 

Support for the ODF format had to be added into the LibreOffice extended namespace. This was done with a "data-table" element that was added to the "chart:chart" element. The "data-table" element only has a link to a certain style instance (linked with "style-name" attribute to a style:style element with the same "name" attribute). The data table specific properties are attributes of the "chart-properties" element ("loext:show-horizontal-border", "loext:show-vertical-border", loext:show-outline", "loext:show-keys" attributes), that can be added to a style. The style can also have "graphic-properties" and "text-properties", which are mapped to line, fill and text properties of the data table on import (and vice-versa on the export).

The support for the data tables is currently available in LibreOffice master and will be present as a feature of LibreOffice 7.5 when released. 
 

Monday, March 7, 2022

Sparklines in Calc

Sparklines are mini charts available in OOXML (XLSX) documents, but until now  were not supported by LibreOffice Calc. Thanks to the funding of NGI, this missing feature is now being implemented.


This project has received funding from the European Union’s Horizon 2020 research and innovation programme under grant agreement No 871498


To add support in LibreOffice for sparklines, we need to first read them into the LibreOffice data model, but the data model for sparklines doesn't yet exists, so we need to create that first. Sparklines are defined for one cell, but multiple sparklines can be grouped together into a group, which shares the same properties for rendering the sparkline. The unique data that is defined only for one sparkline is the data range, that a sparkline will use for rendering.

With this in mind we create a data model that consists of classes: SparklineCell -> Sparkline -> SparklineGroup, where SparklineCell is "added" to a cell and just holds a pointer to the Sparkline.

There are 3 types of sparklines supported in OOXML: line, column and stacked. The "line" type renders a line for the data range, "column" type shows each data point as a column bar, and "stacked" is a win/loss column bar, that shows if the data is positive or negative. 


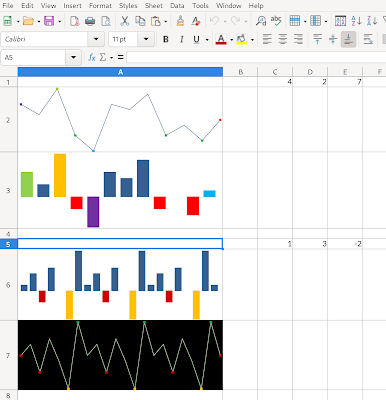
Figure 1: "Line" and "Column" sparklines in LibreOffice Calc

There are many properties for a sparklines that can be customised by the user. These are some of them:
  • First Point, Last Point - if enabled, it shows the first and/or last point in different custom color (See Figure 1 - "column" sparkline in A3 cell, first is green and last is blue).
  • High Point, Low Point - if enabled, it shows the highest point and/or lowest point in different custom color (See Figure 1 - "column" sparkline at A6 cell, low points are in yellow).
  • Negative Point - if enabled, it shows the negative points in a different custom color (See Figure 1 - "column" sparkline at A6 cell, negative points are red).
  • Markes - if enabled, it shows the markers (only for "line" type) (See Figure 1 - "line" sparkline at A2 cell - shows markers).
  • Axis - if enabled, it shows the axis line
  • Right-to-left - if enabled, it shows the data in the right to left order
  • ...

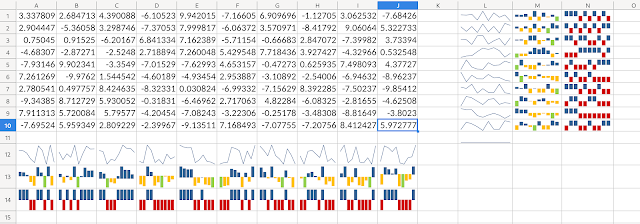
Figure 2: Horizontal and vertical sparklines of all 3 types


Once we have the data model ready we can render the sparklines in the cell area. In Calc this currently looks like in Figure 1 and Figure 2. The Figure 1 shows examples of "line" and "column" sparklines (2 of each), and Figure 2 shows all three types for a block of (random) data (horizontally and vertically).

Currently the code for this is in a feature branch (feature/sparklines), but is in the process of being up-streamed to master. The feature will be available in LibreOffice 7.4.

Next step

With the current implementation, we can open a XLSX document with sparklines and they will be rendered in LibreOffice Calc, but we can't save the document and preserve the sparklines yet. It is also not possible to create new sparklines from scratch or change any of the properties yet (there is no UI for it). ODF support is also missing.

This things will be implemented in the following weeks, and when they are ready, I will blog about them again. 

Monday, September 13, 2021

Document searching and indexing export - Part 3

Milestone 3 - Gluing everything together into a search solution

In the part 1 we looked into indexing XML export, and in the part 2 into rendering a search result as an image. In this part we will glue together both parts with an indexing search engine (Solr) into a full solution for searching and introduce a "proof of concept" application for searching of documents.

Thanks to NLnet Foundation for sponsoring this work.

Solr search platform

Apache Solr is a popular platform for searching and the idea is to use it as our search and indexing engine. First we need to figure out how to put the indexing data from our indexing XML into Solr. Solr uses the concept of documents (not to be confused with a LibreOffice document), which is an entry in the database, which can contain multiple fields. To add documents into the database, we can use a specially structured Solr XML file (many others are supported, like JSON) and simply send it using a HTTP POST request.   

So we need to convert our indexing XML into Solr structure, which is done like this:
  • Each paragraph or object is a Solr document.
  • All the attributes of a paragraph or object is an field of a Solr document.
  • The paragraph text is stored in a "content" field.
  • An additional field is "filename", which is the name of the source (Writer) document.
For example:
    <paragraph index="9" node_type="writer">Lorem ipsum</paragraph>

transforms to:
    <add>
      <doc>
        <field name="filename">Lorem.odt</field>
        <field name="type">paragraph</field>
        <field name="index">9</field>
        <field name="node_type">writer</field>
        <field name="content">Lorem ipsum</field>
      </doc>
      ...
    </add>

Searching using Solr

Solr has a extensive API for querying/searching, but for our needs we just need a small subset of those. Searching is done by sending a HTTP GET to Solr server. For example with the following URL in browser:

http://localhost:8983/solr/documents/select?q=content:Lorem*

"documents" in the URL is the name of the collection (where we put our index data), "q" parameter is the query string, "content" is the field we want to search in (we put the paragraphs text in "content" field) and "Lorem*" is the expression we want to search for.


Proof of concept web application

Figure 1: Search "proof of concept" web application


The application is written in python for the server side processing and HTTP server and the client side HTML+JavaScript using AngularJS (for data binding, REST services) and Bootstrap (UI). The purpose of the web app is to demonstrate how to implement searching and rendering in other web applications.

The web app (see Figure 1) shows a list of documents in a configurable folder, where each document can be opened in Collabora Online instance. On top there is a edit filed and the "Search" button, with which we can search the documents, and a "Re-Index Documents" button, which triggers re-indexing of all the documents. 
Figure 2: Search "proof of concept" web application - Search Results

After we enter a search expression and click the "Search" button, we get a page with search results, which is a table of the document filename and the rendered image from the document, where in the document the search result has been found. See Figure 2 for an example.
There is a "Clear" button at the bottom, which clears the search results and shows the initial list of documents again.

About Server.py - REST and HTTP server

The server has the following services:
  • Provide the HTML and JS documents to the browser, so the web app can be shown
  • GET service "/document" - returns a list of documents
  • POST service "/search" - triggers a query in Solr and returns the result
  • POST service "/reindex" - triggers the re-indexing process
  • POST service "/image" - triggers rendering of an image for the input search result, and returns the image as base64 encoded string

Re-indexing service

Re-indexing glues together the "convert-to" service of the Collabora Online server, to get the indexing XML for a input document, conversion of the indexing XML to Solr supported XML and updating the entries in the Solr server.

Search service

Search service is using the Solr query REST service to search, and transforms the result to a JSON format, that we can use in the web app and is also compatible to use as an input to render a search result.

Image service

Sending a search result and the document to "render-search-result" HTTP POST service on Collabora Online server, the image of the search result is rendered and sent back. For easier use in the web client, the image is converted to base64 string. 

Demo video

Video showing searching in the WebApp:


Video showing re-indexing in the WebApp:


Proof of concept web app source location and relevant commits

The proof of concept web application is located in Collabora Online source tree inside the indexing sub-folder. Please check the README file on how to start it up.

Collabora Online:

Fixes and changes for LibreOffice core:


Tuesday, August 17, 2021

Document searching and indexing export - Part 2

Milestone 2 - Rendering an image of the search result


In the part 1, I talked about the functionality added to LibreOffice to create indexing XML file from the document, which can be used to feed into a search indexing engine. After we search, we expect a search hit will contain the added internal node information from the indexing XML file. The next step is that with the help of that information, we now render that part of the document into an image.

Thanks to NLnet Foundation for sponsoring this work.

Figure 1: Example of a rectangle for a search string

Calculating the result rectangle

To render an image, we first need to get the area of the document, where the search hit is located. This is implemented in the SearchResultLocator class, which takes SearchIndexData that contains the internal model index of the hit location (object and paragraph). The algorithm then finds the location of the paragraph in the document model, and then it determines, what the rectangle of the paragraph is.

The search hit can span over multiple paragraphs, so we need to handle multiple hit locations. With that we get multiple rectangles, which need to be combine into the final rectangle (union of all rectangles). See figure 1 for an example.

Rendering the image from the rectangle in LOKit

This part is implemented for the LOKit API, which can already handle rendering part of the document with an existing API, using rendering of the tiles.

The new function added to the API is:
bool renderSearchResult(const char* pSearchResult, unsigned char** pBitmapBuffer, int* pWidth, int* pHeight, size_t* pByteSize);

The method renders an image for the search result. The input is the pSearchResult (XML), and pBitmapBuffer, pWidth, pHeight, pByteSize are output parameters.

If the command succeeded, the function returns true, the pBitmapBuffer contains the raw image, pWidth and pHeight contain the width and height of the image in pixels, and pByteSize the byte size of the image. 

What happens internally in the function is, that the content of pSearchResult is parsed with a XML parser, so that a SearchIndexData can be created and send to SearchResultLocator to get the rectangle of the search hit area. A call to doc_paintTile then renders the part of the document enclosed by the rectangle to the input pBitmapBuffer.  

See desktop/source/lib/init.cxx - function "doc_renderSearchResult"

Collabora Online service "render-search-result"

To actually be useful, we need to provide the functionality in a form that can be "glued" together with the search provider and indexer to show the rendered image of the search hit from the document. For this we have implemented a service in the Collabora Online. The service is a just a HTTP POST request/response, where the in the request we send the document and the search result to the service, and the response is the image.

What the service does is:
  • load the document
  • run the "renderSearchResult" with the search result XML
  • interpret the bitmap and encode into the PNG format
  • return the PNG image
As an example how the service can be used, see in Collabora Online repository: test/integration-http-server.cpp - test method HTTPServerTest::testRenderSearchResult 

The following commits are implementing this milestone 2 functionality:

Core:
 

Thursday, July 1, 2021

Document searching and indexing export - Part 1

About the idea

Searching for a phrase in multiple documents is not a new thing and many implementations exist, however such searching will usually only provide you if and roughly where in the documents a searched phrase exists. With Collabora Online and LibreOffice we can do better than this and in addition provide the search result in form of a thumbnail of the search location. In this way it is easier for the user to see the context, where the searched phrase is located. For example, if it is located in a table, shape, footer/header, or is it figure text or maybe "alt" text of an image. 

Thanks to the sponsor of the work - NLnet Foundation, we are implementing this solution for Writer documents.

The solution to this consist in 3 parts:

  • preparing the data for indexing, 
  • indexing and searching 
  • rendering of the result
Preparing the data for indexing and rendering of the search result is done in LibreOffice core, while the actual indexing and searching is delegated to one of the existing indexing and searching databases / frameworks (we will provide support for Apache Solr). 

In this post I will describe what has been done for milestone 1.

Milestone 1 - preparing data for indexing

Indexing data usually consists of (enriched) text, however in our case we also need to provide additional internal information, where the text is located, so it is possible to later go to the search result location and create a thumbnail of the document. In Writer we can provide a node index of the paragraph, with which it is possible to quickly identify the text in the document model and generate a thumbnail of the area around the text.

The data for indexing is provided by a "indexing export" filter in LibreOffice, which creates a XML document with a custom structure. The root element is <indexing> and the child elements are paragraphs with index and text, which can be nested in sub-elements (like image, shape, table, section) depending on where the paragraph is located. 

For example:

 <?xml version="1.0" encoding="UTF-8"?>
<indexing>
 <paragraph index="6">Drawing : Just a Diamond</paragraph>
 <paragraph index="12"></paragraph>
 <shape name="Circle" alt="" description="">
  <paragraph index="0">This is a circle</paragraph>
  <paragraph index="1">This is a second paragraph</paragraph>
 </shape>
 <shape name="Diamond" alt="" description="">
  <paragraph index="0">This is a diamond</paragraph>
 </shape>
 <shape name="Text Frame 1" alt="" description="">
  <paragraph index="0">This is a TextBox - Para1</paragraph>
  <paragraph index="1">Para2</paragraph>
  <paragraph index="2">Para3</paragraph>
 </shape>
</indexing>

The indexing export is build upon a ModelTraverser class, which was created for the indexing purpose, but can be reused for other purposes (it is similar to what AccessibilityCheck does, but generalised, so AccessibilityCheck can in the future be refactored to use it). 

The purpose of ModelTraverser is to traverse through the Writer document model, and provide SwNode and SdrObjects to the consuming objects - in our case IndexingExport class, which extracts the text from those objects (depending on the object type) and with help of a XmlWriter, writes the indexing data to the XML file.

Indexing export filter can be tested with the LibreOffice command line "convert-to" tool in the following way:

soffice --convert-to xml:writer_indexing_export <Writer document file path>


The commits implementing this milestone 1 functionality:

In the next milestone, we will render the thumbnail with the provided search result data.


To be continued...

Thursday, May 13, 2021

Command Popup HUD for LibreOffice

Command Popup is a pop-up window that lets you search for commands that are present in the main menu and run them. This was requested in bug tdf#91874 and over-time accumulated over 14 duplicated bugs reports, so it was a very requested feature.

I'm intrigued by similar functionality in other programs, because it enables very quick access to commands (or programs) and at the same time don't need to move your hand off the keyboard. It also makes it easy to search for commands - especially in an application like LibreOffice with humongous main menu. So I decided to try to implement it for LibreOffice.

Figure 1: Command Popup window

I was working on it here and there in my free time and managed to make it work as I imagined, however it was very rough around the edges and needed a lot of polish. Luckily in April, we had a hack week at Collabora, where I decided to use some time to work on finishing the command popup. I dusted up the old code and converted it to use the weld framework for widgets and fixed the many bugs, but I didn't manage to finish it completely so it took until recently that I actually pushed the code upstream into master.

The main UX focus is to easy search and navigate with the keyboard. When the Command pop-up is focused, all keyboard events should go to the search edit box, so it is possible to change the search term, however hitting up/down should change the selection in the tree view, where the search results are shown, and enter should execute the command. To get this working correctly was quite a challenge, but I found the correct formula eventually after trying some different ideas. Of course using the mouse should still work as well. 

To show the Command Popup, there is a menu entry in "Help > Search Commands" and is by default bind to "Ctrl+F1" shortcut (however this may change). 

The Command Popup will be available in LibreOffice 7.2, but if you want to try it out, you can get the current daily build, or wait for the LibreOffice 7.2 Alpha1. Any suggestions and comments are welcome. If you find a bug, please report it in the LibreOffice bugzilla page.


Wednesday, March 24, 2021

Built-in "Xray" like UNO object inspector – Part 3

DevTools implementation has been completed and this is the third and final part of the mini-series. The focus of this part is on the object inspector, but I have also improved or changed other DevTools parts, so first I will briefly mention those.

New menu position


Figure 1: Development Tools location in the menu

The position in menu has changed from "Help / Development Tools" to "Tools / Development Tools". The new position fits better as it is near the position of macro editor and they go hand in hand with each-other.

Updates to the document model tree view


Figure 2: Document model tree view and "Current Selection" toggle button

The left-hand side document model tree view has been changed to use the same approach than the object inspector tree view uses, where the object attached tree view (in this case DocumentModelTreeEntry) has all the behavioural logic for a specific tree view node. This makes it easier to manipulate the tree view and add new nodes (if necessary).

In the document object tree view I have added a top toolbar with "Refresh" (icon) button and I changed the existing “Current Selection” button to a toolbar toggle button, so it looks more consistent as the is only the toolbar now (see figure 2).

In Writer, each paragraph tree view node now has text portion child nodes (as shown in figure 2), to make it possible to quickly inspect all the individual parts of a paragraph.

The object inspector tree view

Figure 3: Top toolbar and tab bar in object inspector


The object inspector shows various information about an object. Each object has a implementation class, which is always shown for the current object (see figure 3).

The other information that the object inspector shows are divided into four main categories:
  • "Interfaces" - the interfaces that the current object implements
  • "Services" - the services that the current object supports
  • "Properties" - the properties of the current object
  • "Methods" - the combined methods that can be called on the current object
On the user interface, the categories are divided with a tab bar (see figure 3). Each tab represents a different categories. The tabs are filled on "entry" - when the user clicks on the tab.

In the code the tabs and tree views are all handled by the ObjectInspectorTreeHandler and the hierarchy of objects attached the tree view that implement the ObjectInspectorNodeInterface (see include/sfx2/devtools/ObjectInspectorTreeHandler.hxx). 

The two major categories are "Properties" and "Methods", which I describe in more detail next.

Properties

Figure 4: Object inspector "Properties" tab


There are three types of properties of an object:
  • Properties accessible view XPropertySet.
  • Properties defined as an attribute (marked "[attribute]" in IDL). 
  • Pseudo properties defined by a get and set method. 
All the three types are represented in the properties tab and can be identified by the "Info" column. Attribute properties have an "attribute" flag, pseudo properties have either a "get", "set" or both flags. If neither flags exists, it represents a property that is from XPropertySet. 

In the tree view there are four columns for each property - "Name", "Value", "Type" and already mentioned "Info". The "Name" of the property is always available, but it is possible that two properties have the same name (because of multiple property types). The "Value" shows the value of the property, which is converted to the string, if this is possible (it should be if the property is basic), otherwise a representation string is created. The representation string for objects shows the implementation name ("<Object@SwXTextRange>"), for sequences it shows the size ("<Sequence [5]>") and for structs it just mentions the type ("<Struct>").

A node in the “Properties” tree view can be expanded (if offered) so it is possible to recursively inspect the the objects further. In case the property is a struct, it shows the struct members, and if it is a sequence, it shows the indices each object has in the sequence.

There are special properties, which names start with "@". This are added for convenience, so it is possible to inspect objects, that implement XIndexContainer, XNameContainer or XEnumeration interfaces. When such an object is found, the entries gathered using those interfaces are added to the tree view, and are prefixed with "@". For example "@3" (XIndexContainer)   "@PageStyles" (XNameContainer or XEnumeration). The type of the special property is written in the "Info" column ("index container", "name container" and "enumeration" flags). Note that this functionality is not present in Xray or the Macro editor's debugger, but was added for convenience.

Figure 5: "Properties" tab and the text view

On the bottom of the "Properties" tab there is a text view, which shows the full value of the current selected property. In the tree view, the value shown is always using a short form (shortened to 60 chars with new-line characters removed) to not make the tree view too wide. The full value therefor is written in the text view, where it can be inspected in full and has also a working copy/paste (see figure 5).

Object Stack

Related to the "Properties" is the object stack. It is possible to select an object in the tree view and inspect the object (either using the context menu or the toolbar "Inspect" action). In this case the object in the object inspector will change to the selected one. This is convenient when you are only interested in one object down in the tree view hierarchy and want to inspect only that. In that case the previous object will be added to the stack, and can be returned to with hitting the "Back" button in the toolbar.

Note that going to another object (not using "Inspect" action) will always remove the object stack. 

Methods

Figure 6: Object inspector "Methods" tab


The "Methods" tab contains a tree view that shows all the methods, that can be called for the current object. Each method is represented by four columns (see figure 6):
  • "Method" - name of the method
  • "Return type" - the return (simplified) type of the method
  • "Parameters" - list of input parameters, where each one lists the direction ("in", "out" or "in/out"), the parameter name and the simplified type 
  • "Implementation Class" - class/interface where the method is implemented
Currently the types of parameters and return types are simplified, with only basic types, "void", "any", "sequence" and "object" that represents all the objects and the type of the object isn't written. The reason for this is to make it easier to read. 

Future ideas

There are many improvements that can still be made, but aren't included in the current implementation. 

I think it would be quite convenient to have the ability to open a object inspector in mode-less dialog separate to the DevTools, just to quickly look up a property. 

Another big upgrade would also be the ability to change values of basic types for the properties and structs, so it is possible to quickly see what effect the change would have. Similar to changing property values is to call methods with defining the parameters, but only if the parameters are basic types.

My initial vision of DevTools was not that it will be only one tool (object inspector), but more tools just like the development tools in the browser, so I'm sure there will be more useful things integrated over time.

I think there are a lot of ideas you may also have, so please tell me if you have a good one. Of course if you find something that is not working as expected, please let me know.

Credits

Many thanks to TDF and users that support the foundation by providing donations, to make this work possible.

Monday, March 1, 2021

Built-in "Xray" like UNO object inspector – Part 2

Since my last blog post I've been continuing the work on DevTools and since then a lot of things have progressed. Point & click has been implemented and the object inspector view has been greatly improved to show current object’s properties and methods. In this part I will mainly talk about the point & click and a bit about the current state, and in the next blog I will extensively talk about the object inspector.

Point & click

Figure 1: Current selection button


The idea of this functionality is to provide a way to inspect selected objects in the document, for example an image or a shape. For this, I have implemented a selection change listener (sfx2/source/devtools/SelectionChangeHandler.hxx), whose purpose is to listen to the selection changes that happen in the document and store the latest selection object. It is started when the DevTools docking window is instantiated and shown. I have added a new toggle button “Current Selection” (see Figure 1) to the UI. When the button is selected, it automatically shows the current selected object (gathered with the selection change listener) in the object inspector. 

Figure 2: Current selected shape's properties shown in the object inspector

In the example shown in Figure 2, we can see the shape is selected in the document and its properties are shown in the object inspector. If the "Current Selection" button wouldn't be toggled, then the document top-level object would be shown in the object inspector or the selected object in the DOM tree view.

While the "Current Selection" button is toggled, selecting any object in the DOM tree view (left-hand side tree view) has no effect, however if the current selected object is also present in the current DOM tree view, it will be selected. Note that if the object is not present in the tree, it won't be selected, because the DOM tree view will not force creation of on-demand object because of performance considerations.

Figure 3: "Inspect Object" command in "Customize" dialog 


In addition to showing the selected object, I have added a UNO command named “Inspect Object” (.uno:InspectSelectedObject), which can be added to context menus for objects (See Figure 3). The purpose of this command is to provide a way to open the DevTools docking window and automatically show the current selected object. If a user regularly uses the object inspector, this may be a more convenient way for them to access DevTools. Note that by default the command isn't added to any context menu, this is up to the user. However, if there will be demand to add this to context menus, it can be easily added. 

Figure 4: "Inspect Object" context menu entry on a shape object

The example in Figure 4 shows the context menu of a shape object, where the selected entry is the added "Inspect Object". 

From the implementation standpoint, it was necessary to move the whole DevTools from svx to sfx2 module. This was mainly necessary to get .uno:InspectSelectedObject to work, because we need to signal to DevTools that we want to show the current selection and not the document root in the object inspector. Because the svx depends on sfx2 module, it is not possible to access svx from sfx2 (only the other way around). 

Improvements to object inspector

The object inspector was previously a single tree view only, which had services, interfaces, properties and methods categories as root tree entries. This has now been changed so that the categories are now pages in a tab view, and each category has its own tree view (can be seen in Figure 2). The main problem with one tree view is that columns for each of the categories are different. For example, the properties category has object, value and type categories but the same columns make no sense for methods (which has return type and input parameters). 

For methods it now shows the method name, return type and parameters. The types are currently simplified types, which are easier to read (instead of exact type name of the object it just writes "object"), but the user will want to know the exact type too, so this is a WIP.

For properties it shows the type and value of the property, and it is possible to expand a property if the type is a complex type (object, struct) so it lists nested properties. If the value is an enum, then we get the name of the enum value automatically and show the name instead. 

Support for sequences was also added, so the sequence can be expanded and a list of indices and values is presented. If the current object supports XNameAccess or XIndexAccess, the names and indices are added into the property list, so the user can navigate to those. 

With this additions, it is already easier to inspect objects than it previously was using the Xray tool, and I'm sure it will get even better when it is finished. 

Next steps

The object inspector is already in a very good shape so I encourage everyone to try it and give feedback, what can be improved, changed or added - especially if you use Xray or MRI regularly. 

For the next steps the major focus will be to fix a couple of bugs and crashes (mainly due to missing checks if objects are available), work on the UI, object stack (so it is possible to go back to the previous object) and finalizing all the features of the object inspector. 

Credits

Many thanks to TDF and users that support the foundation by providing donations, to make this work possible. 

To be continued...

Thursday, January 21, 2021

Built-in "Xray" like UNO object inspector – Part 1

When developing macros and extensions in LibreOffice it is very useful to have an object inspector. With that tool you inspect the object tree and the methods, properties and interfaces of individual objects to understand its structure. There are quite some different object inspectors available for LibreOffice as extension. Probably the best known is called “XrayTool”, but there were also others like MRI, which was build for a similar purpose and various other more simple object inspectors (for example one is provided as an code example in ODK).

As a tool like this is very valuable it makes sense that it would be provided out-of-the-box by LibreOffice without the need for the user to get it separately. Also the user could even be unaware the such a tool exists.  For this reasons The Document Foundation (TDF) put up a tender to create a built-in Xray like UNO object inspector, which was awarded to Collabora and we are now in the process of implementing it.

Thank you TDF and the donating users of LibreOffice to make the work on this tool possible.

The Plan

The major gripe with Xray and other tools is that the user needs to go into the macro editor and run a the script with the inspecting object as the parameter. 

For example to inspect the root UNO object:

Xray ThisComponent

or for example to inspect a specific (first) Calc sheet:

Document = ThisComponent
AllSheets = Document.getSheets()
MySheet = AllSheets.getByIndex(0)
Xray MySheet

Figure 1: Watch window in the macro editor

We can do much better than this. So the idea is to have a object inspector tool as a dockable bottom widget, very similar to “developer tools” that you can find in popular web browsers.

The left hand side of the tool will have a subset of the document model (DOM) presented as a tree and on the right hand side a object inspector view that will show the current UNO object’s properties, methods in a tree view that is taken from the Watch window in the LibreOffice macro editor (see Figure 1). When the user would select an UNO object in the DOM tree view (left-hand side), the object inspector (right-hand side) would show it.

An additional functionality that is present in developer tools in web browsers is the ability to point & click an object directly in the document, which can then be inspected in the developer tool. A similar functionality to this will be possible in LibreOffice, where you will be able to select an object in the document, that is then be shown in the object inspector (right-hand side).

Implementation so-far

The implementation has been divided into 4 parts:

  1. Introduce a new dockable window on the bottom of the UI.
  2. DOM tree view (left-hand side)
  3. Implement point&click functionality.
  4. Object inspector view (right-hand side)

Currently the 1. and 2. part have been implemented, so this blog post serves as a report of the work that has been done until now. For 3. and 4. part, a limited subset of the functionality has been  already implemented, but it is not yet expected to work correctly and may change a lot in the future.

Dockable window

Figure 2: Development Tool in the menu

The dockable window has been added to all components of LibreOffice, which can be enabled in the menu (see Figure 2) under Help / Development tool (this location and the name can still change). The development tool code is all contained under svx/source/devtools/ where the docking window is implemented in DevelopmentToolDockingWindow.cxx.

DOM tree view (Left-hand)

Figure 3: Development tool dockable window

The idea of the DOM tree view is to provide a useful subset of the DOM objects, that the user can quickly access and inspect. Without this, the users would have to traverse to the objects they are interested in inside the object inspector itself, which may not be as straight forward to the users that aren’t familiar with the DOM, and even if they are, the DOM subset still makes it easier.

The DOM tree view as currently implemented (see Figure 3), has a root “Document” element always available, which represents the root document UNO object, from where you can traverse to any other relevant UNO object in the DOM tree. Other available objects depend on the component.

In Writer the available objects are:

  • Paragraphs
  • Shapes
  • Tables
  • Frames
  • Graphic Objects
  • Embedded Objects (OLE)
  • Style Families & Styles

In Calc:

  • Sheets
  • Shapes (per sheet)
  • Charts (per sheet)
  • Pivot Tables (per sheet)
  • Style Families & Styles

In Impress and Draw:

  • Pages / Slides
  • Shapes (per page / slide)
  • Master Slides
  • Style Families & Styles

If there are other object(s) you would like to see in the DOM tree view, please let me know.

The main implementation file for the left-side DOM tree view is DocumentModelTreeHandler.cxx in the svx/source/devtools/ folder. For each node of the tree view, there is an object attached (subclass  DocumentModelTreeEntry) to the node, which is responsible to fill the child nodes and provide the UNO object of the current node. The whole DOM tree view is populated on-demand, when the tree is expanded. This makes sure that we don’t take a lot of time inserting the whole object tree before-hand and have a more up-to-date view of the UNO objects. 

All the code is present in the LibreOffice master repository. Please try out the development tools in a recent daily build. Any comments or suggestion are welcome. 

Next part - point&click functionality

Partial support for the point&click has already been added. There is a selection listener added, which remembers what the selected object in the document is. This object is the available in the DOM tree view under the name “Current Selection”. If the user clicks on the node in the tree view, then the right-hand object inspector shows the UNO object.

To be continued..

Tuesday, October 13, 2020

PDF annotations support

In Draw, a PDF document can be opened using the PDFium library for rendering, where each page in the Draw document contains an rendered image from the PDF. This mode is useful for viewing PDFs and allows for the best fidelity. With viewing, there is also a need to review and comment and this is where PDF annotations come in as adding the support for the PDF annotations and to support a review based workflow has been one of my recent task at Collabora Productivity.

PDF supports a wide variety of annotations, but we don't support all of them in Draw. What we do support are comments, which are similar to pop-up note annotations in PDF, so the easiest is to add those first. To be able to use pop-up notes in Draw, we need to import them. This is done at import by using PDFium after we created the PDF graphic for rendering. In Draw, we then insert this as comments and so we get the basic support for manipulating with annotations, but how to save the changes? PDF export already supports saving comments as annotations, so this mostly already works (I needed to fix some bugs and add support for saving all needed properties).


Figure 1. Pop-up Note annotation in PDF viewer (Evince) and Draw

How the output compares between a PDF viewer and inside LibreOffice can be seen in Figure 1. All this is available in LibreOffice master and should be included in LibreOffice 7.1.

What about other annotations that are supported in PDF? The work to add those is ongoing and the recent success has been adding support to draw vector graphic annotations like polygon, ink (freehand), squares (rectangles) and circles (ellipses). So the idea is that instead of the usual marker for a comment, we draw a vector graphic that we read from the PDF annotation. 

The first thing I needed to do is to extend the PDFium library, which didn't support reading all polygon vertices and ink strokes from the document. What also wasn't supported is reading the border information, which is needed for line widths.

Next thing is extending the import to read the geometry data, so I dded a special PDFAnnotationMarker class for that. Then the geometry data needs to be stored on the sd::Annotation class (implementation of XAnnotation, but I didn't extend XAnnotation at this point as it wasn't needed - yet) . Drawing is performed in AnnotationTag, where we create a new OverlayPolyPolygon object, that is responsible for creating the Primitive2D for the marker. What we get after this is done is shown in figure 2.


Figure 2. Multiple annotations in PDF Viewer and Draw

This work will shortly be merged to the LibreOffice master. 

Wednesday, January 22, 2020

Accessibility checker and support for PDF/UA specs

PDF/UA or ISO 14289 is a specifications that defines the requirements for accessibility in a PDF document. The specification defines the required structure and formatting of the document (also refers to WCAG specification from W3C for use on the web) and PDF features, which should be enabled or disabled so the document is better suited for accessibility (for example PDF tags are required).

Thanks to the Dutch Standardisation Forum for financially sponsoring and Collabora Productivity in cooperation with Nou&Off for the work on implementing this specification into LibreOffice.

Figure 1: PDF Export
The implementation in LibreOffice is currently done only for Writer. It consists of two parts.: First is to enable PDF/UA support into PDF export, which writes a PDF/UA flag into the PDF document and enables all the required features. The PDF export dialog was extended with a checkbox (see figure 1).

Figure 2: Accessibility Check in menu 

The second part is an accessibility check functionality, which traverses the document structure and gather all possible accessibility issues. The accessibility check can be run manually through the menu under Tools - Accessibility Checker (see figure 2), or it will be triggered after PDF export dialog, if the PDF/UA support is enabled. The accessibility issues are presented in a dialog (see figure 3).

Figure 3: Accessibility check dialog

The checks that are (currently) implemented are:

  • Check that the document title is set.
  • Check that the document language is set, or that all styles that are in use, have the language set.
  • Check all images, graphics, OLE objects for the alt (or title in some objects) text.
  • Check tables don't include splits or merges, which aren't allowed by the specifications. The table should be 
  • Check for fake/manual numbering (not using integrated numbering). For example writing "1." "2." "3." at the beginning of the paragraphs.  
  • Check that hyperlink text is not a hyperlink itself - hyperlink should be described. 
  • Check for the contrast between text and the background. The algorithm is described in the WCAG specification.  
  • Check for blinking text, discouraged for the obvious reasons.
  • Check for footnotes and endnotes, which should be avoided.
  • Check for heading order. Order of the headings must increase incrementally with no skips (for example Heading 1 to Heading 3, skipping Heading 2).
  • Check, if text conveys additional meaning with (direct) formatting.

The PDF/UA support will be included in LibreOffice 7.

Monday, April 23, 2018

Improving the image handling in LibreOffice - Part 3

GraphicObject refactoring


GraphicObject and the implementation of XGraphicObject (UnoGraphicObject) and XGraphic (UnoGraphic) were located in module svtools, which is hierarchically above vcl. This is problematic when creating new instances like in Graphic.GetXGraphic method, which needs to bend backward to make it even work (ugly hack by sending the pointer value as URL string to GraphicProvider). The solution to this is to move all GraphicObject related things to vcl, which surprisingly didn't cause a lot problem and once done, it looks like a much more "natural" place.

Regarding the UNO API of XGraphicObject - what is left to do here is to properly clean up the uniqueID, as it is not possible to use it anymore for anything else as a uniqueID (used only in filters for the image names, if the name is not yet known).

Managing memory used by images


Figure1: Hierarchy before refactoring


Previously the memory managing was done on the level of GraphicObjects, where a GraphicManager and GraphicCache (see figure 1) were responsible to create new instances from uniqueID and manage the memory usage that GraphicObject take. This is not possible anymore as we don't operate with uniqueIDs anymore, but always use Graphic and XGraphic objects  (in UNO), so we need to manage the creation of Graphic object or more precisely - ImpGraphic (Graphic objects are just ref. counted objects of ImpGraphic). 
Figure 2: Hierarchy after refactoring
So to make this possible GraphicManager and GraphicCache need to be decoupled and removed from GraphicObject and a new manager needs to be introduced between Graphic and ImpGraphic, where the manager controls the creation and accounts for the memory usage (see Figure 2).

Graphic swapping and swapping strategy


In the To release the memory of graphic objects, we swap them out to a temp file and read back (swap-in) when we need them again. In the previous implementation this was partially directed by the SdrGrafObj (common image implementation) and SwGrfNode (Writer image implementation). For each graphic object there was a timer when to trigger an automatic swap-out + the swap-out that can happen when a memory limit is exceeded.

For the new code external swapping directed from SdrGrafObj and SwGrfNode was removed, so they can't influence when swapping will happen (maybe in the future they can provide hints when it is a good time to do swapping). There is now a global timer which triggers checking of all Graphic objects if any of them can be swapped out in case we exceed memory limit. Same code is triggered when a new object is created too. A object will be swapped out if it is not used for a certain amount of time. Each object tracks the timestamp when it was last used.

A swap-in happens if the object is swapped-out (obviously) and certain data is needed (under-laying bitmap, animation or metafile). This is checked at the same code-path where the timestamp updating happens.

The new swapping strategy is relatively simple - if a lot of memory is needed by graphic objects in a certain time, we let it use it and don't try to over-aggressively try to free it. In the past this cased swap-out and swap-in cycle that made the application completely unusable. In the future, external hints when a certain Graphic object can be swapped out may be added, so we can perform swapping more effectively. There are also several other ideas which will increase performance and reduce memory usage that can be implemented now with the new hierarchy where most all of the swapping is contained inside the Graphic itself, but all of this is currently out of the scope of this work.

Other changes to Graphic


Another changes to Graphic done were related to lazy loading. When a document is loaded, we don't want to load Graphic into memory, if it is not needed yet (for example we display the first page but the graphic is on page 10). In document filters (ODF for example) we previously transported the URL of an external or internal graphic to the document model, where it was lazily loaded when it was actually needed. This is not possible now anymore as we need to create a XGraphic object already in the document filter. To overcome this we need to to have an unloaded Graphic, which is created already in a swapped-out state and swapped-in when needed.

The GraphicFilter didn't allow something like this, so I needed to add a new method, which doesn't actually load the image, but just gathers what kind of the image is loaded and its metadata (image size) and creates a GfxLink object that includes the (compressed) image data. The metadata is needed as we don't want to actually force a load when this basic information is requested. Actually we want to load the image as late as this is possible.

Another issue is also that we can have an external image (loaded from a file or even URL on the internet). The issue is similar to the lazy loading scenario, but it is different that a Graphic now must know the URL with which it was created and can be created completely empty (no loading of any kind). The reason for this is that loading is directed by the LinkManager, which is part of the document model. For security reasons the LinkManager can not allow that a Graphic is loaded so loading is directed by the LinkManager on demand (first usage). LinkManager also takes care of all URLs of various external resources. The user can look at those resources and change the URL of them or trigger an update. Changing URL and updating an object was previously done in SdrGrafObj and SwGrfNode, but now this is moved to the common code in Graphic object where SdrGrafObj and SwGrfNode only direct what to do. There are still rooms to improve things here, however not the scope of this work.

Next steps


Finishing up this work by revising the UNO API and fixing known bugs.

Credits


Many thanks to Collabora Productivity, TDF and users that support the foundation by providing donations, to make this work possible.

To be continued...